Popo's Pineapple Buns (Bolo Bao): The Recipe She Never Wrote Down

My grandmother never measured anything. She'd feel the dough, watch it proof, and somehow — somehow — her pineapple buns came out perfect every single time. Bolo bao with that signature crackled golden crust, soft sweet bread underneath, and a kitchen that smelled like butter and memory.
I've spent two years trying to capture what her hands knew. This is the closest I've gotten.
Why These Are Worth the Effort
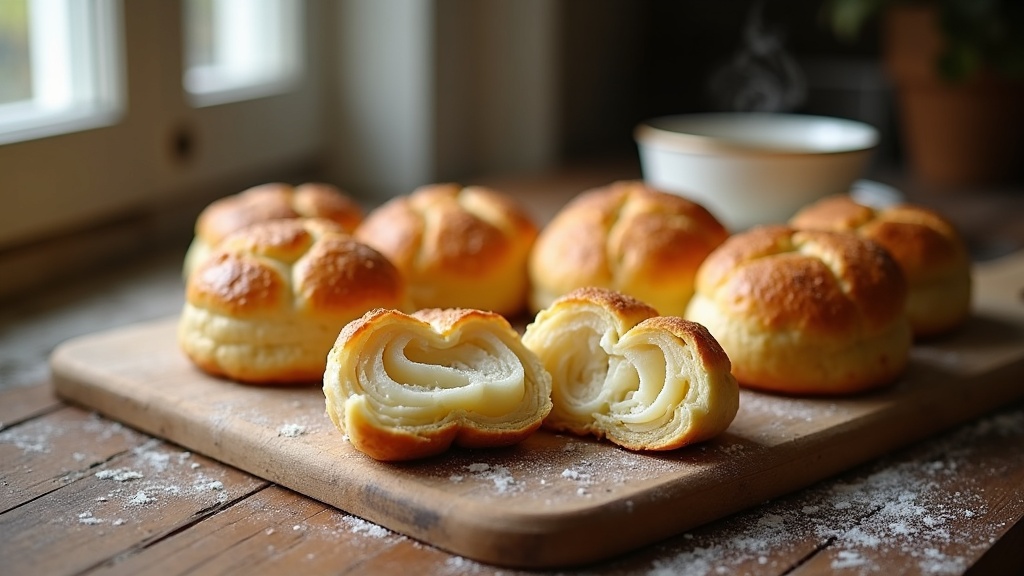
Pineapple buns have nothing to do with pineapples. The name comes from the crackled pattern on top — it looks like a pineapple's skin. The magic is in the contrast: a soft, slightly sweet milk bread base topped with a thin, sweet, crumbly cookie crust that shatters when you bite it.
Popo made these every Sunday. I'd watch her knead the dough by hand (she never owned a stand mixer), shape the topping with practiced speed, and somehow time the bake so they came out just as my uncles arrived for tea. She never checked a timer. She just knew.
I've tested this recipe eleven times. Eleven. The dough hydration, the topping ratio, the proofing time — I tracked everything in my notebook. This version is as close as I can get to Popo's without her hands guiding mine.
Equipment You'll Need
- Stand mixer with dough hook (or strong arms and 15 minutes of kneading)
- Large mixing bowl
- Pastry brush
- Baking sheet lined with parchment
- Kitchen scale (seriously — weighing is essential here)
- Plastic wrap
Hand mixer note: The dough needs serious kneading for gluten development. If you don't have a stand mixer, prepare for an arm workout. Popo did it by hand her whole life — you can too.
The Milk Bread Dough
Ingredients (makes 8 buns):
- 300g bread flour (2½ cups — but weigh it)
- 45g granulated sugar (3½ tablespoons)
- 4g instant yeast (1¼ teaspoons)
- 3g salt (½ teaspoon)
- 30g unsalted butter, softened (2 tablespoons)
- 180ml whole milk, lukewarm (¾ cup)
- 1 large egg yolk (save the white for the topping)
Instructions:
- Mix dry ingredients: In your stand mixer bowl, whisk together flour, sugar, yeast, and salt.
- Add wet ingredients: Pour in the milk and egg yolk. Mix on low until a shaggy dough forms, about 2 minutes.
- Knead: Increase to medium speed and knead for 8 minutes. The dough should be smooth and starting to pull away from the bowl sides. (If kneading by hand: 12-15 minutes of folding and pushing until smooth.)
- Add butter: With the mixer running, add softened butter one tablespoon at a time. Knead another 5-7 minutes until the dough is silky, elastic, and passes the windowpane test (stretch a small piece thin enough to see light through without tearing).
- First proof: Transfer to an oiled bowl, cover with plastic wrap, and let rise at room temperature until doubled — about 1 to 1½ hours. Popo's kitchen was always warm from cooking, so her dough rose faster. If your kitchen is cool, find a warm spot.
The Cookie Topping (The "Pineapple" Part)
This is where the magic happens. The topping is essentially a thin sugar cookie dough that you drape over the bread. It cracks as the bread expands in the oven, creating that signature pattern.
Ingredients:
- 60g unsalted butter, softened (4 tablespoons)
- 50g granulated sugar (¼ cup)
- 1 large egg yolk (use the white from the dough + this yolk = 1 egg total)
- ¼ teaspoon vanilla extract
- ¼ teaspoon baking powder
- 120g cake flour or all-purpose (1 cup — cake flour gives a more tender crust, but AP works)
- ¼ teaspoon salt
Instructions:
- Cream butter and sugar: Beat softened butter and sugar until light and fluffy — about 3 minutes. Don't rush this. The air incorporation matters.
- Add egg and vanilla: Mix in the egg yolk and vanilla until combined.
- Add dry ingredients: Whisk together flour, baking powder, and salt, then mix into the butter mixture just until a soft dough forms. It should be thick but pliable, like play-doh. If it's too sticky, chill for 10 minutes.
- Divide and shape: Divide into 8 equal pieces (about 30g each). Roll into balls, then flatten into thin discs — about 3 inches across. They should be thin enough to crack but thick enough to hold their pattern. This took me four attempts to get right. (Don't make them too thick or they won't crack properly. Too thin and they'll dissolve into the bread.)
Assembly and Second Proof
- Deflate and divide: Punch down the risen dough and divide into 8 equal pieces (about 70g each). Roll each into a tight ball.
- Place on baking sheet: Space them 3 inches apart — they spread.
- Add topping: Drape a cookie disc over each dough ball. Gently press the edges to adhere, but don't press the center — you want the middle to crack, not stick.
- Second proof: Cover loosely with plastic wrap and let rise 30-40 minutes until puffy. The topping will start to crack slightly — this is good.
- Brush with egg wash: Beat that reserved egg white with a teaspoon of water. Brush over the topping — this gives it the golden color and slight sheen.
The Bake
Preheat to 350°F (175°C). Bake for 15-18 minutes until the topping is golden with deep cracks and the bottoms sound hollow when tapped.
Critical note: Every oven is different. Popo used a gas oven with hot spots she knew by heart. My third attempt burned on the bottom while the top was pale. I now rotate the pan at the 10-minute mark. Do this.
Make-Ahead and Storage
These are best the day they're made — the contrast between crisp topping and soft bread is at its peak. But they'll keep in an airtight container at room temperature for 2 days. The topping softens, but they're still delicious.
To re-crisp: 5 minutes in a 325°F oven.
Freezing: Freeze baked buns wrapped tightly for up to 1 month. Thaw at room temperature and re-crisp in the oven.
Troubleshooting
Topping didn't crack: It was either too thick or over-worked. Roll thinner next time and handle minimally.
Topping slid off: The dough was too wet or you pressed too hard in the center. Make sure the dough isn't over-proofed, and only press the edges of the topping.
Bread is dense: Under-proofed. Let it rise until truly doubled — be patient.
Topping burned before bread cooked: Your oven runs hot on top. Lower rack position, or tent with foil after 10 minutes.
Too sweet / not sweet enough: This is preference. Popo used less sugar than most recipes — I've kept it moderate. Add 10g more sugar to the dough if you prefer sweeter bread.
What Popo Would Say
She'd tell me I'm overthinking it. She'd laugh at my notebook full of hydration percentages and timing notes. And then she'd take a bite, nod once, and say "Not bad" — which from her was high praise.
These won't taste exactly like hers. Her hands had sixty years of practice. But they taste like memory, like Sunday afternoons in her kitchen, like the love she kneaded into every batch.
That's enough. That's everything.
Made these? Tell me how they turned out — especially if you're honoring a family recipe too. I read every comment.
Want more Popo's Kitchen recipes? Popo's Egg Tarts: The Recipe She Never Wrote Down was my first attempt at capturing her legacy.