Mastering the Art of Perfect Sourdough Bread at Home

This post covers everything needed to bake a proper sourdough loaf at home—from building a starter and choosing flour to shaping, scoring, and baking in a hot Dutch oven. Whether the goal is a crackling crust, an open crumb, or simply a loaf that doesn't resemble a doorstop, the techniques here will get results. Sourdough isn't about perfection on the first try. It's about understanding what the dough is telling you and responding accordingly.
What makes sourdough bread different from regular bread?
Sourdough relies on wild yeast and naturally occurring bacteria rather than commercial yeast packets. That difference changes everything—the flavor, the texture, the shelf life, and even how the bread sits in the stomach. Regular sandwich bread (the kind made with instant yeast) ferments quickly and predictably. Sourdough takes its time.
During that longer fermentation, lactic acid bacteria produce acetic and lactic acids. These acids create the signature tang and help break down gluten and phytic acid, which some people find easier to digest. The result is a loaf with more complex flavor and a chewier, more interesting texture than a standard white loaf.
Here's the thing: sourdough isn't a specific type of bread so much as a method. A sourdough baguette, a sourdough batard, and a sourdough boule all share the same living starter foundation. The baker shapes and bakes them differently. That said, the wild fermentation is what gives sourdough its identity.
How do you start a sourdough starter from scratch?
Mix equal parts flour and water by weight in a jar, leave it uncovered or loosely covered at room temperature, and feed it daily until it begins to rise and fall predictably. That's the entire process in one sentence. The reality involves a little more patience—but not much more skill.
Day one: combine 50 grams of whole wheat flour (King Arthur Whole Wheat works well here) with 50 grams of lukewarm water in a clean glass jar. Stir until smooth. Leave the jar on a kitchen counter away from direct sunlight. By day three or four, bubbles should appear and a faint sour smell should develop. If not, keep going. Some starters wake up faster than others.
Once the mixture doubles in volume within four to six hours of feeding, it's ready to bake with. At that point, switch to a maintenance routine—discard half and feed with fresh flour and water once a day if kept at room temperature, or once a week if stored in the refrigerator. Many home bakers keep their starter in a King Arthur Baking sourdough guide recommends a consistent feeding ratio of 1:1:1 (starter, flour, water) by weight for predictable results.
The catch? Starter maintenance can feel wasteful because of the daily discard. Smart bakers collect that discard in a separate container and use it for pancakes, crackers, or banana bread. Nothing needs to go to waste.
What equipment do you need to bake sourdough at home?
Not much. A kitchen scale, a mixing bowl, a bench scraper, a proofing basket (banneton), and a heavy lidded pot for baking. Optional but helpful items include a lame for scoring, a thermometer, and a spray bottle for creating steam.
The table below compares three common Dutch ovens used by home sourdough bakers:
| Product | Material | Best For | Price Range |
|---|---|---|---|
| Lodge Cast Iron Double Dutch Oven | Cast iron | Round boules, easy loading | $50–$70 |
| Le Creuset Signature Round Dutch Oven | Enameled cast iron | Even heat, long-term durability | $300–$400 |
| Challenger Bread Pan | Black ceramic | Oval and round loaves, max steam | $250–$300 |
Worth noting: the scale matters more than the pot. Sourdough recipes are written by weight, not volume. Measuring cups introduce too much variability. A simple digital scale like the OXO Good Grips Stainless Steel Food Scale (about $50) does the job reliably. For temperature checks, the ThermoWorks Thermapen ONE reads dough and oven temperatures in about one second.
As for proofing baskets, a basic cane banneton from Breadtopia costs around $20 and lasts for years with proper care. Line it with a linen couche if the dough tends to stick. No need for expensive gear to start.
Why does sourdough bread taste tangy?
The tang comes from organic acids—mainly acetic acid and lactic acid—produced by bacteria living in the starter. Think of the starter as a tiny ecosystem where yeast and bacteria coexist. The yeast creates carbon dioxide (which makes the dough rise), and the bacteria create flavor.
The level of tang can be adjusted. A stiffer starter fed with white flour and kept at warmer temperatures produces more lactic acid, which tastes milder and yogurt-like. A wetter starter fed with whole grain flour and kept cooler produces more acetic acid, which tastes sharper and more vinegary. So if the goal is a San Francisco-style sour punch, use more whole grains and let the dough proof in the refrigerator overnight. For a softer, more subtle flavor, stick to bread flour and room-temperature fermentation.
Here's the thing: water chemistry and ambient temperature also play roles. A kitchen at 75°F behaves very differently from one at 65°F. Sourdough is reactive. It responds to the environment. That reactivity is part of what makes it frustrating—and also what makes it rewarding.
How long does it really take to make a sourdough loaf?
From mixing the flour and water to pulling a baked loaf from the oven, the process usually takes between 18 and 24 hours. Only a small fraction of that time involves active work. Most of it is waiting.
A typical timeline looks like this:
- Autolyse (1 hour): Mix flour and water and let them rest. This hydrates the flour and begins gluten development without any kneading.
- Bulk fermentation (4–12 hours): Add the starter and salt, then fold the dough periodically. This is where the rise happens. Time varies wildly based on temperature.
- Pre-shape and bench rest (30 minutes): Gently shape the dough into a loose round and let it relax.
- Final shape and cold proof (8–16 hours): Shape the dough tightly, place it in a banneton, and refrigerate overnight. Cold proofing improves flavor and makes scoring easier.
- Bake (45–60 minutes): Preheat the Dutch oven to 450°F–500°F, score the dough, and bake covered for 20 minutes. Then remove the lid to develop color and crust.
That said, the timeline is flexible. Some bakers skip the cold proof and bake the same day. Others extend bulk fermentation to 14 hours in a cool kitchen. The dough—not the clock—should dictate the pace. Look for a dough that has risen noticeably, jiggles when the bowl is shaken, and shows bubbles on the surface and underneath.
What's the best flour for sourdough baking?
High-protein bread flour is the safest starting point for beginners because it develops strong gluten and holds its shape well during fermentation. King Arthur Bread Flour (12.7% protein) is widely available and consistently performs well in home ovens.
Whole wheat flour adds flavor, nutrition, and color—but it also makes the dough heavier and trickier to handle. Many successful recipes use a blend: 80% bread flour and 20% whole wheat. This gives the loaf structure while still delivering depth of flavor. Rye flour is another option, often used in small amounts (5–10%) because it ferments quickly and brings an earthy, almost malty quality.
For more advanced reading on flour science and fermentation, Serious Eats breaks down the chemistry in accessible detail. And for inspiration from a professional-turned-home baker, The Perfect Loaf offers recipes and techniques that scale well for domestic kitchens.
Common mistakes and how to avoid them
Under-fermentation is the number one reason sourdough turns out dense and gummy. The dough looks puffy, so the baker assumes it's ready. But inside, the gluten network hasn't fully developed, and the yeast hasn't produced enough gas. The fix? Give it more time. Sourdough rarely fails because it fermented too long—it usually fails because it didn't ferment long enough.
Over-proofing is the opposite problem. The dough rises, peaks, and then collapses. It becomes slack, sticky, and impossible to score. Learning to recognize the "poke test" helps: press a floured finger into the dough. If it springs back immediately, it needs more time. If it springs back slowly and leaves a small indent, it's ready. If it stays depressed and doesn't spring back at all, it's over-proofed.
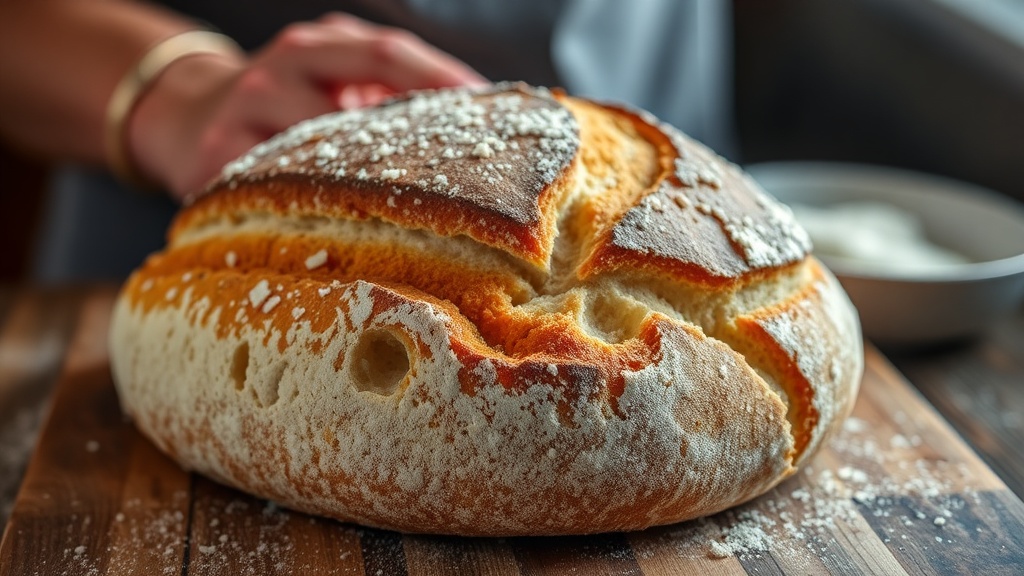
Another frequent issue is poor scoring. A dull knife or hesitant cut won't create the expansion path the loaf needs. The bread bursts randomly in the oven instead of opening gracefully along the score line. A sharp bread lame (the Wire Monkey lame is popular among home bakers) and a confident, swift cut at a 45-degree angle solve this.
Steam matters too. Professional ovens inject steam during the first phase of baking. Home ovens don't. The Dutch oven traps the dough's own moisture, mimicking that steamy environment. Removing the lid after 20 minutes allows the crust to harden and caramelize. Without that trapped steam, the crust sets too early and the loaf won't achieve its full oven spring.
Baking sourdough at home is a skill built through repetition. Each loaf teaches something new about timing, temperature, and handling. Some days the crumb is open and airy. Other days it's tighter than hoped. Both are edible. Both are progress. The goal isn't to eliminate variables—it's to understand them well enough to bend them in the right direction.