How to Make Perfect Sourdough Bread at Home

This guide walks through the complete process of baking tangy, crusty sourdough bread from scratch — no commercial yeast required. You'll learn how to build and maintain a starter, mix and fold dough, and achieve that coveted open crumb and crackling crust that makes homemade sourdough worth every minute of effort.
What Do You Need to Start Baking Sourdough?
Not much, actually. That's the beauty of it.
At minimum, you'll need a kitchen scale (the Escali Primo works well and costs around $25), a large mixing bowl, a bench scraper, a proofing basket or bowl lined with a floured tea towel, and a Dutch oven. The Lodge 5-Quart Double Dutch Oven performs beautifully and won't break the bank. You'll also need flour, water, and salt — that's it.
Many beginners overthink equipment. A lame (that's the curved blade for scoring) helps, but a sharp knife or razor blade works fine. A digital thermometer? Nice to have, not required. Temperature control matters more than gadgets — around 75°F (24°C) is the sweet spot for fermentation.
Here's the thing: sourdough has a reputation for demanding specialty tools. It doesn't. Start simple. Add gear as you go.
How Do You Make a Sourdough Starter From Scratch?
Mix equal parts flour and water by weight, leave it out, and feed it daily until it bubbles and doubles predictably.
Day one: combine 50g whole wheat flour (the King Arthur Whole Wheat provides excellent wild yeast food) with 50g lukewarm water. Stir until smooth, cover loosely, and let sit at room temperature for 24 hours.
Day two: discard half (yes, it feels wasteful — that's normal), then add 50g all-purpose flour and 50g water. Repeat this discard-and-feed routine every 24 hours.
By days five to seven, you should see bubbles, smell something tangy-sweet, and watch the mixture double within four to six hours of feeding. That's when you know it's alive. Name it if you must — many bakers do.
The catch? Starter behaves differently in every kitchen. Colder rooms slow fermentation. Warmer rooms speed it up. Adjust accordingly. A sluggish starter might need twice-daily feedings. An overly acidic one (smells like nail polish remover) benefits from more frequent refreshments with less waiting time between feeds.
Worth noting: you can maintain a smaller starter to reduce waste. A 1:1:1 ratio by weight (starter:flour:water) of just 20g each keeps things manageable.
What's the Best Flour for Sourdough Bread?
Bread flour produces the strongest gluten network and tallest loaves, but blending flours creates more complex flavor.
| Flour Type | Protein Content | Best For | Flavor Profile |
|---|---|---|---|
| King Arthur Bread Flour | 12.7% | Beginners, structure | Mild, versatile |
| Central Milling Artisan Bakers Craft | 11.5% | Balanced open crumb | Subtly sweet, wheaty |
| Whole Wheat (any brand) | 13-14% | Flavor, nutrition (blend at 20-30%) | Nutty, earthy, dense |
| Rye Flour | 8-9% | Starter food, small blends | Complex, tangy, fruity |
High protein matters — it creates the gluten that traps gas and builds structure. That said, don't chase protein percentages blindly. The wheat variety and milling process affect performance more than a single percentage point.
Many excellent bakers use a blend: 80% bread flour, 20% whole wheat. This delivers height and oven spring while adding depth of flavor. Rye — even just 5% — accelerates fermentation and adds complexity.
How Long Does It Take to Make a Loaf of Sourdough?
From mixing to slicing: about 24 hours. Active hands-on time: roughly 30 minutes spread across that day.
Here's a typical timeline:
- Evening before: Feed your starter. It should peak by morning — bubbly, domed, just starting to recede slightly.
- Morning (30 minutes): Autolyse — mix flour and water, let rest. This hydrates the flour and starts gluten development without any effort from you.
- 30 minutes later: Add starter and salt. Mix by hand or with a dough whisk until incorporated.
- Next 3-4 hours: Bulk fermentation with stretch-and-folds every 30 minutes for the first two hours. (Four sets total — that's it.)
- Midday: Pre-shape, bench rest 30 minutes, final shape, then into the proofing basket.
- Afternoon/evening: Cold retard in the refrigerator — 12 to 24 hours. This develops flavor and makes scoring easier.
- Next morning: Preheat Dutch oven to 500°F (260°C) for an hour. Bake covered 20 minutes, uncovered 20-25 minutes until deeply golden.
- Crucial final step: Cool completely — at least two hours — before slicing. Warm bread gummifies when cut.
That said, timing flexes. Warmer kitchens move faster. Cold weather slows everything. Watch the dough, not the clock.
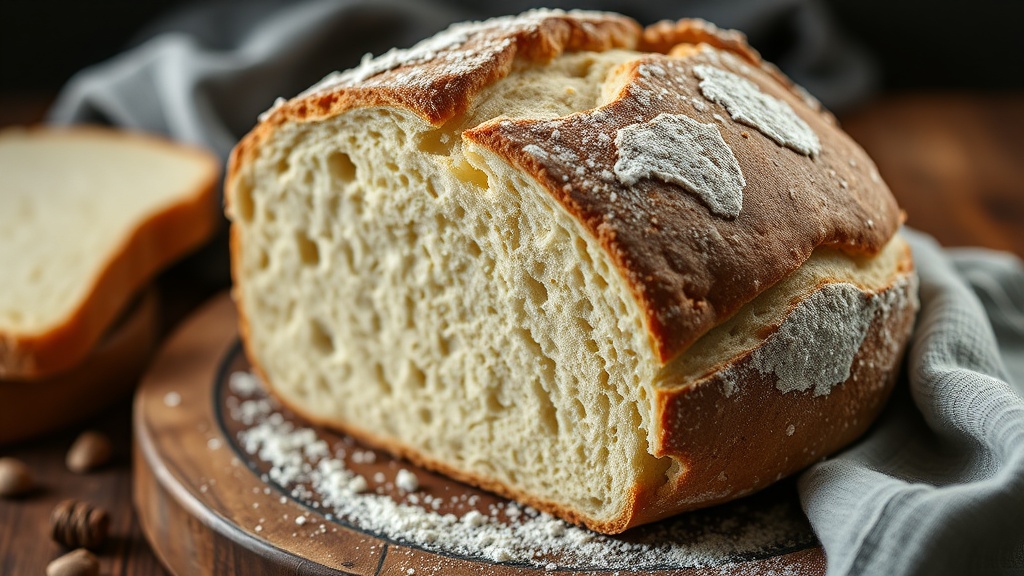
Why Is My Sourdough Dense and Gummy?
Usually: under-fermentation, insufficient gluten development, or slicing too soon.
Under-proofed dough hasn't developed enough gas structure. It feels tight, doesn't hold an indentation when poked, and bakes into a brick with a tight, gummy crumb. The fix? Give it more time during bulk fermentation. The dough should increase in volume by 50-75% and feel jiggly, alive.
Over-proofed dough — less common for beginners but possible — collapses and spreads. It smells overly sour, alcoholic. Still bakeable (call it "rustic"), but flatter.
Improper folding leaves weak gluten. Those stretch-and-folds aren't optional rituals; they align gluten strands and build the network that holds shape. Four sessions of four gentle stretches — north, south, east, west — transform sloppy batter into cohesive dough.
Another culprit: too much whole grain flour without adjusting hydration. Whole wheat absorbs water differently. Drop hydration by 5% when experimenting with higher percentages.
How Do You Get a Crispy, Crackly Crust?
Steam during the first half of baking, then dry heat to finish.
The Dutch oven method creates a self-contained steam chamber. The trapped moisture keeps the crust soft long enough for the loaf to expand fully — that's "oven spring." Remove the lid, and the dry heat hardens and colors the crust.
For extra crackle: bake slightly darker than feels comfortable. That deep mahogany color brings flavor (Maillard reaction — the same chemistry that makes seared steak delicious). Spritz the dough with water before closing the lid. Or add an ice cube to the Dutch oven — creates billowing steam.
Post-bake: don't bag the bread immediately. Let it breathe uncovered for several hours. The crust stays shatteringly crisp for a day, then softens naturally. (That's when toasting revives it.)
How Do You Store Sourdough Bread?
Cut side down on a cutting board, uncovered, for up to three days. After that: freeze.
Refrigeration ruins bread — it accelerates staling. Plastic bags soften the crust into sadness. Paper bags work for day-old bread but dry it out quickly.
For freezing: slice the whole loaf first, then freeze slices flat before bagging. This lets you pull out exactly what you need. Toast directly from frozen — tastes fresh-baked.
"The best bread is the bread you actually bake. Don't wait for perfect conditions."
Stale sourdough has purpose. Cube and toast for croutons. Pulse into breadcrumbs. Soak in milk for pain perdu (that's fancy French toast). Or make ribollita, the Tuscan soup that exists specifically to use up old bread.
Troubleshooting Quick Reference
- Flat loaf, no oven spring: Under-proofed or over-proofed. Check timing and temperature.
- Spreads sideways: Weak gluten — more folds next time, or lower hydration.
- Burnt bottom: Lower oven rack, use a baking stone or sheet underneath the Dutch oven.
- Stuck to proofing basket: Rice flour in the liner — it doesn't absorb moisture like wheat flour.
- Huge irregular holes with dense areas: Uneven fermentation — mix starter more thoroughly into dough.
Baking sourdough teaches patience. Not the patience of waiting — though there's plenty of that — but the patience of paying attention. Each loaf offers feedback. Each failure (and there will be failures) contains the lesson for the next success.
Start this weekend. Mix flour and water. Watch bubbles form. Fold dough, shape it, bake it. The first loaf might not win prizes. The tenth will make you proud. The fiftieth — yours to imagine.
Steps
- 1
Feed and activate your sourdough starter 4-6 hours before mixing
- 2
Mix flour and water, then perform stretch and folds every 30 minutes
- 3
Shape the dough, proof overnight, and bake in a preheated Dutch oven