10 Essential Bread Baking Techniques Every Home Baker Must Master

Proper Kneading and Gluten Development
Understanding Fermentation and Proofing Times
Mastering the Windowpane Test Technique
Artisan Scoring Patterns for Perfect Oven Spring
Steam Control for Crispy Crust Formation
Bread baking sits at the intersection of science and comfort. Master these ten foundational techniques, and the difference between amateur loaves and bakery-quality bread becomes strikingly clear. Whether you're wrestling with dense sandwich bread or gummy sourdough, this guide breaks down the skills that transform flour and water into something worth sharing.
What Is Autolyse and Why Does It Matter?
Autolyse is simply letting flour and water rest together before adding salt and yeast. That's it. During this rest—typically 20 minutes to an hour—the flour hydrates fully and gluten development begins without any kneading.
The result? Dough that's easier to handle, more extensible, and (here's the kicker) bread with better flavor and structure. King Arthur Baking recommends autolyse for nearly all artisan breads, and professional bakers swear by it for good reason. When flour meets water, enzymes activate and start breaking down starches into simpler sugars. More sugar means more food for yeast—and more flavor for you.
For home bakers, here's the practical bit: mix your flour and water, walk away for 30 minutes, then come back to add everything else. The dough will feel smoother, silkier—almost like it's been working out while you weren't watching. Skip this step, and you're fighting the dough from minute one.
Whole grain flours benefit most from longer autolyse periods—think 45 minutes to an hour. White bread flour? Twenty to thirty minutes does the trick. Don't overthink the timing; even a short rest beats none at all.
How Do You Know When Dough Is Properly Kneaded?
Properly kneaded dough passes the windowpane test: stretch a small piece thin enough to see light through without tearing.
Here's where many home bakers stumble. Under-kneaded dough tears immediately when stretched—gluten hasn't developed enough. Over-kneaded dough (rare but possible with powerful stand mixers) tears because the gluten structure actually breaks down. The sweet spot? Smooth, elastic dough that springs back when poked.
Hand kneading takes 8-12 minutes for most recipes. A stand mixer with a dough hook? Four to six minutes on medium-low speed. The KitchenAid Artisan Series remains the gold standard for home bakers, though the Bosch Universal Plus handles larger batches with less motor strain.
Watch the dough, not the clock. Room temperature, humidity, flour brand—all of these shift timing. Your hands tell you more than any timer. When the dough stops sticking to your fingers and starts feeling alive (that slight resistance, that gentle pushback), you're there.
What's the Difference Between Bulk Fermentation and Proofing?
Bulk fermentation happens right after kneading; proofing happens after shaping. Two distinct stages, each non-negotiable.
During bulk fermentation, yeast consumes sugars and produces carbon dioxide and alcohol. The dough doubles (roughly), develops complex flavors, and builds structure. This is where most of the magic happens. Proofing, on the other hand, is the final rise after you've shaped your loaves. It's shorter—usually 30-90 minutes—and gives the bread its final oven spring.
The catch? Temperature rules everything. Dough at 75°F ferments faster than dough at 65°F. A lot faster. Professional bakeries use proofing boxes; home bakers get creative. The oven with the light on works. A microwave with a cup of hot water works. Even a cooler with a heating pad set to low does the job.
Over-proofed dough collapses—sad, flat bread results. Under-proofed dough tears in the oven, sometimes violently. The poke test saves you here: press a floured finger into the dough. Under-proofed? It springs back immediately. Perfectly proofed? The indentation fills slowly, partially. Over-proofed? It stays depressed. Learn this test. Use it often.
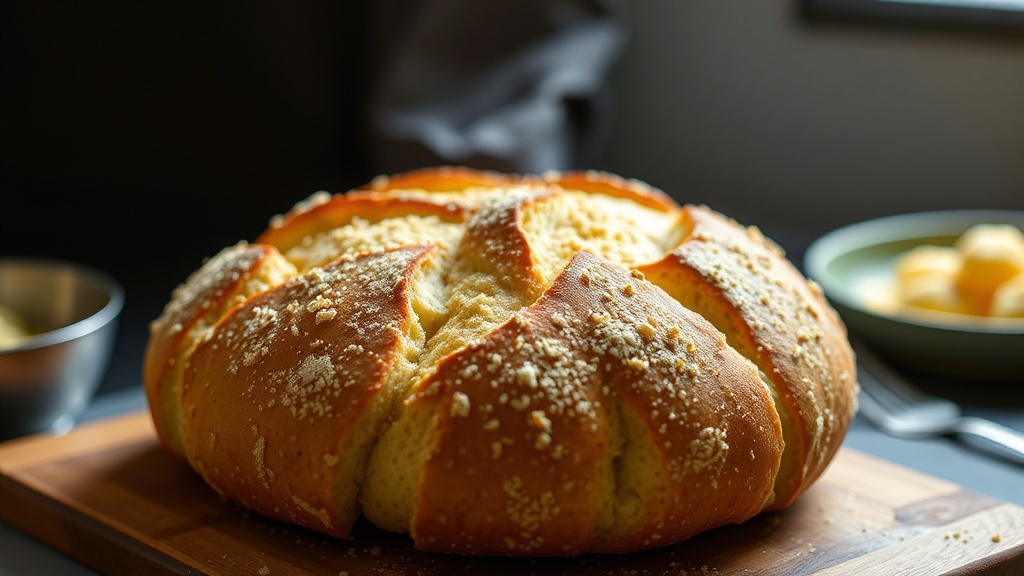
How Should You Score Bread for the Best Oven Spring?
Scoring creates a weak spot where steam escapes predictably, directing how the loaf expands in the oven.
Without a score, bread ruptures where it wants to—not where you want it to. The result? Ugly, unpredictable tears that wreck your crust structure. A clean, decisive score channels expansion exactly where you intend.
You don't need fancy tools to start. A sharp chef's knife works in a pinch. For serious scoring, invest in a Breadtopia bread lame—the curved blade creates those dramatic "ears" you see on artisan loaves. The Wiremonkey lames (handmade in Vermont) have developed something of a cult following for their balance and blade angle.
| Scoring Pattern | Best For | Result |
|---|---|---|
| Single deep slash | Batards, baguettes | Classic ear, maximum expansion |
| Cross pattern | Round boules | Even expansion, rustic look |
| Leaf/lattice pattern | Decorative breads | Visual appeal, controlled cracking |
| Multiple parallel slashes | Baguettes | Traditional French appearance |
Angle matters. A 45-degree slash creates those beautiful raised ears; straight 90-degree cuts just split the dough flat. Depth too—quarter inch for most breads, slightly deeper for wet doughs. Confidence counts. Hesitant, shallow scoring drags and tears. One clean motion, decisive and smooth.
Why Is Steam Essential for Artisan Crust?
Steam delays crust formation, allowing the loaf to expand fully before the exterior hardens.
In the first 10-15 minutes of baking, steam keeps the dough surface moist and flexible. The loaf can spring—sometimes doubling in volume as trapped gases expand. Once the crust sets, expansion stops. No steam means early crust formation, which means dense, stunted bread.
Home ovens vent steam automatically (frustrating, that). You have to fight back. A preheated Dutch oven traps natural steam—Lodge enameled Dutch ovens run $60-90 and work beautifully. No Dutch oven? Preheat a cast iron skillet on the bottom rack, add ice cubes right after loading your bread. Or spray the oven walls with water (carefully—don't hit the glass door, which can shatter).
Some bakers use lava rocks in a pan, pouring water over them for explosive steam generation. Others swear by soaked towels in a loaf pan. Worth noting: commercial steam injection systems run thousands of dollars, so don't expect bakery-level results from home hacks. You can get 80% of the way there with basic techniques.
Remove steam after the initial spring phase—usually 15-20 minutes. The dry heat then caramelizes sugars, creating that shattering, mahogany crust everyone wants.
How Do You Shape a Tight Loaf That Holds Its Structure?
Surface tension determines whether your loaf stands tall or spreads into a pancake.
The goal: create a "tight skin" on the outside of the dough. This tension helps the loaf hold its shape during proofing and directs upward expansion in the oven. Slack, loose shaping gives you flat bread every time.
For a round boule: flatten the dough gently, fold edges to center, flip seam-side down, and drag toward you across the counter. The friction against the surface pulls the dough tight, creating that smooth, taut top. Rotate and repeat. You'll feel the resistance—when it fights back slightly, you're done.
Batards (oval loaves) follow similar principles but add a letter-fold first. Flatten, fold top to middle, bottom over that, then seal and drag. The Flour Water Salt Yeast method (popularized by Ken Forkish) emphasizes minimal handling—touch the dough as little as possible while still building tension.
Wet doughs—ciabatta, focaccia—can't be shaped traditionally. That's fine. Embrace the slackness, use heavily floured hands, and work quickly. Different breads demand different approaches. Trying to shape focaccia like a baguette is an exercise in frustration.
What Temperature Should Water Be for Yeast?
Active dry yeast activates best in water between 105°F and 110°F; instant yeast tolerates cooler temperatures and can be mixed directly into flour.
Here's the thing—water temperature affects fermentation speed dramatically. Cooler water slows everything down (sometimes desirable for flavor development). Warmer water accelerates fermentation but can kill yeast above 140°F. A simple kitchen thermometer removes the guesswork. The ThermoWorks ThermoPop reads in 3-4 seconds and costs around $35.
Professional bakers calculate desired dough temperature (DDT), adjusting water temperature based on room temperature and flour temperature to hit precise fermentation targets. Home bakers rarely need this precision, but the principle helps: cold kitchen? Use warmer water. Hot summer day? Use ice water.
Instant yeast (SAF Red Label, widely available at grocery stores) forgives temperature variations better than active dry. If you're using active dry, always bloom it in warm water first—skip this, and dead yeast means dead dough.
How Do You Create and Maintain a Sourdough Starter?
A sourdough starter is a living culture of wild yeast and bacteria, fed regularly with flour and water to keep it active.
Starting one requires patience—5 to 14 days before it's strong enough to leaven bread. Mix equal weights flour and water (50/50 by weight, not volume). Whole grain rye or whole wheat flour kickstarts fermentation faster than white flour (more nutrients for the microbes). Let it sit at room temperature, loosely covered.
Discard half and feed daily. Within 2-3 days, bubbles appear—activity, but not ready. The smell shifts from floury to sour to slightly funky (that funk means bacteria; hang in there). By day 5-7, it should double within 4-6 hours of feeding, with a predictable rise-and-fall pattern.
Once established, maintenance depends on your baking schedule. Weekly bakers keep starters in the fridge, feeding once a week. Daily bakers keep them at room temperature, feeding daily. The King Arthur Baking website offers comprehensive starter troubleshooting—when it separates (hooch on top), when it smells like acetone, when it just won't rise.
How Do You Bake Evenly in a Home Oven?
Baking stones and steel store and radiate heat more effectively than thin oven walls, eliminating hot spots and browning the bottom crust properly.
Home ovens cycle temperature—swinging 25-50 degrees above and below the set point. They have hot corners, cool zones near the door. A Baking Steel (3/8-inch thick, around $100) absorbs tremendous thermal energy and releases it steadily. Traditional baking stones (like those from Old Stone Oven) cost less ($40-60) but can crack from thermal shock and don't conduct heat quite as aggressively.
Position matters. Stone on the middle rack for most breads. Preheat for at least 45 minutes—an hour is better. The stone needs to be saturated with heat, not just warm to the touch. An infrared thermometer confirms surface temperature; shoot for 450-500°F before loading your bread.
Rotate loaves halfway through baking if your oven has serious hot spots. Most do. Opening the door drops temperature temporarily—resist peeking too early. Steam escapes, crust forms prematurely, and you're back to dense bread.
How Should You Store Fresh Bread?
Store bread cut-side down on a cutting board for same-day eating; freeze for longer storage—never refrigerate.
The refrigerator accelerates staling through a process called retrogradation. Starches crystallize, moisture migrates, and bread turns cardboard-textured within a day. Room temperature storage preserves texture far longer—2-3 days for lean breads, 3-4 for enriched doughs (brioche, challah).
For freezing: cool completely first (warm bread traps condensation and gets gummy). Slice before freezing if you want single pieces. Double-wrap in plastic, then foil. Frozen bread lasts 2-3 months. Revive it directly from frozen—10 minutes in a 350°F oven restores that just-baked crust.
That said, some breads stale faster than others. Baguettes? Best within hours. Sourdough with higher hydration? Holds moisture longer. Enriched breads with fats and eggs stay soft for days but don't freeze as well (fats can oxidize and taste off).