Macarons for Beginners: Yes, You Can Make These!

There's something magical about the first time you peel a perfectly formed macaron off the parchment paper—those smooth shells with the little ruffled "feet" at the bottom, the slight give when you press them gently. I remember standing in my kitchen five years ago, tears in my eyes, because my third attempt had finally worked. Before that, I'd believed the myths: that macarons were only for pastry chefs with fancy equipment, that my humble oven was too temperamental, that I needed a culinary degree and a thermometer for everything. None of that is true, darling. You just need patience, precision, and permission to fail once or twice before you succeed.
I love this recipe because it taught me that baking isn't just about following rules—it's about understanding them. When you make macarons, you enter a delicate dance with humidity, temperature, and texture. But don't let that scare you! Think of it as a conversation with your ingredients, one where you listen more than you speak.
The Ingredients That Matter
Let's talk about what goes into these little jewels. First, almond flour—make sure it's blanched (no brown skins) and extra fine. Those coarse bits from regular almond meal will ruin your smooth tops and create lumpy shells. Next, egg whites: here's my secret—age them. Separate your eggs 24 to 48 hours ahead and let them sit covered in the fridge, then bring to room temperature before baking. This reduces moisture content and helps the proteins relax, creating that stable meringue we absolutely need for structure.
You'll need both granulated sugar (for the meringue) and powdered sugar (mixed with the almond flour). A pinch of cream of tartar helps stabilize the egg whites and create that gorgeous white color, though it's optional if you don't have it on hand.
Step-by-Step: The Macaron Method
1. Prep your dry ingredients: Sift your almond flour and powdered sugar together twice. Yes, twice! I know it's tedious, but those lumps are your enemy, and even small pebbles will crack your shells during baking.
2. The meringue: In a clean, grease-free bowl, beat your aged egg whites until foamy, then gradually add granulated sugar tablespoon by tablespoon. Beat until you have stiff, glossy peaks—the kind that stands straight up when you lift the whisk and doesn't droop. This usually takes 5-7 minutes with a stand mixer.
3. Macaronage: This is the crucial folding step that terrifies everyone. Add your dry ingredients to the meringue in thirds. Fold gently but decisively with a silicone spatula, pressing the batter against the bowl's sides to deflate some air. You're looking for "lava" consistency—it should ribbon off your spatula and melt back into the batter within 30 seconds. Too stiff? Keep folding. Too runny? You've gone too far, but they'll still taste good!
4. Pipe and rest: Transfer to a piping bag with a round tip. Pipe circles onto parchment using a template underneath (I draw circles on paper as a guide). Tap the tray firmly on the counter three times to release air bubbles—this prevents hollow shells. Now—and this is vital—let them sit at room temperature for 30-60 minutes until a skin forms. You should be able to touch them gently without leaving a mark or sticking to your finger.
5. Bake low and slow: 300°F (150°C) for about 15-18 minutes. They should come cleanly off the paper when done, with firm feet and crisp shells that soften as they cool.
Mistakes I Made (So You Don't Have To)
Hollow shells? Your oven was probably too hot, or you over-mixed the batter during macaronage. Cracked tops? You skipped the resting phase, or your meringue wasn't stiff enough. No feet? Usually under-mixed batter or forgetting to tap out those air bubbles. Sticky bottoms? They needed two more minutes in the oven.
Don't despair if your first batch looks like alien pancakes or if the feet spread like a skirt. Mine did too! The third batch is usually when the magic happens, and even the "ugly" ones taste divine.
Make Them Your Own
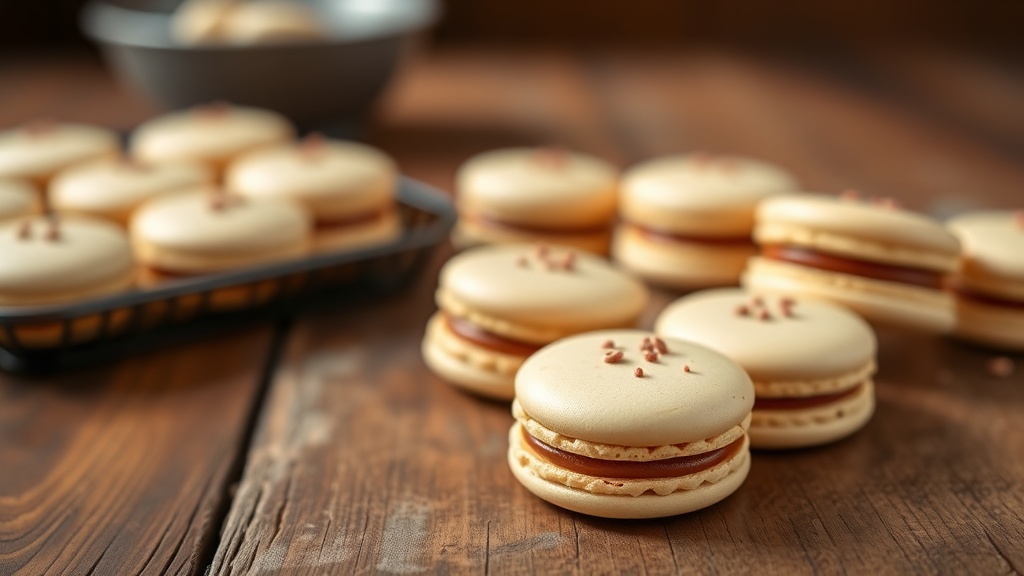
Once you've mastered the basic shell, the world opens up like a jewelry box. Add a drop of gel food coloring to your meringue (never liquid—it adds too much moisture). For fillings, try vanilla bean buttercream, bright lemon curd, or my absolute favorite, salted caramel ganache. Sandwich them and let them mature in the fridge for 24 hours—the texture improves dramatically as the shells absorb moisture from the filling.
Serve these at your next tea party standing tall on a cake plate, package them in pretty boxes for gifts that wow, or simply enjoy one with your afternoon coffee while feeling incredibly proud of yourself.
Remember, baking is love made visible—lumpy feet and all. You've got this!